
12 Gather Ideas and Form a Working Thesis
Kathy Boylan and Jenifer Kurtz
Once you understand the assignment, you will need to collect information in order to understand your topic and decide where you would like the paper to lead. This step can be conducted in various ways. Researching to build content knowledge is always a good place to start this step.
After you have conducted some research, begin brainstorming your topic. You can do this in a variety of ways such as:
- Free Writing
- Listing ideas
- Generate a list of questions
- Clustering/ Mapping (creating a bubble chart)
- Create a basic outline
Next, you will want to formulate a working thesis. A working thesis is different than the thesis found in a final draft in that it will not be specific nor as narrowed as the final thesis. Think of a working thesis as the general focus of the paper, helping to shape your research and brainstorming activities. As you will later spend ample time working and reworking a draft, allow yourself the freedom to revise this thesis as you become more familiar with your topic and purpose.
How do you start writing a draft? There isn’t just one right way to begin writing. Some people dive right in, writing in complete sentences and paragraphs, while others start with some form of brainstorming or freewriting. Others choose a strategy based on the writing task and how familiar they are with the topic. A writing instructor may want you to try out different methods so that you can figure out what works best for you. You may want to have more than one method in case you get stuck and need to break out of a writing block. There are several methods that help you generate ideas and see connections between ideas without writing in complete sentences. We can call these methods “brainstorming.” They all have some common rules:
- Write down all of your ideas; don’t eliminate anything until you are done brainstorming.
- Don’t bother with editing at this stage.
- Work as quickly as you can.
- If you get stuck, stop and review your work OR get someone else’s input.
- Each method can work as a solo technique or with others.
Clustering
A cluster is a method of brainstorming that allows you to draw connections between ideas. This technique is also called a tree diagram, a map, a spider diagram, and probably many other terms.
- To make a cluster, start with a big concept. Write this in the center of a page or screen and circle it.
- Think of ideas that connect to the big concept. Write these around the big concept and draw connecting lines to the big concept.
- As you think of ideas that relate to any of the others, create more connections by writing those ideas around the one idea that connects them and draw connecting lines.
Here’s an example:
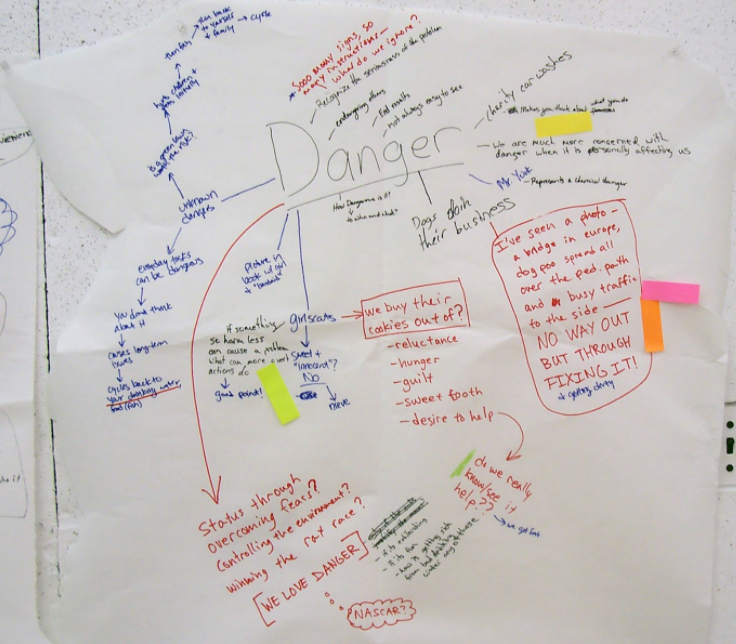
Notice that you can use color, larger type, etc., to create organization and emphasis. Remember that your cluster doesn’t need to look like anyone else’s. Create the cluster in the way that makes the most sense to you. Once you have finished the cluster, you can use another technique to generate actual text.
Listing
Listing is just what it sounds like: making a list of ideas. Here are two kinds of lists you might use.
Brainstorm list: Simply make a list of all the ideas related to your topic. Do not censor your ideas; write everything down, knowing you can cross some off later.
Here’s an example:

What I know/don’t know lists: If you know that your topic will require research, you can make two lists. The first will be a list of what you already know about your topic; the second will be a list of what you don’t know and will have to research.
Outlining
Outlining is a useful pre-writing tool when you know your topic well or at least know the areas you want to explore. An outline can be written before you begin to write, and it can range from formal to informal. However, many writers work best from a list of ideas or from freewriting. (Note: A reverse outline can be useful once you have written a draft, during the revision process. For more on reverse outlining, see “The Revision Process”.)
Traditional Outline
A traditional outline uses a numbering and indentation scheme to help organize your thoughts. Generally, you begin with your main point, perhaps stated as a thesis (see “Developing a Strong, Clear Thesis”), and place the subtopics, usually the main supports for your thesis/main point, and finally flesh out the details underneath each subtopic. Each subtopic is numbered and has the same level of indentation. Details under each subtopic are given a different style of number or letter and are indented further to the right. It’s expected that each subtopic will merit at least two details. Most outlines use either a phrase or a sentence for each item.
Here’s an example:
There are several reasons why a person might get a tattoo.
I. In memory of someone or something
- Son gets a tattoo in memory of his mother
- her favorite flower
- her name
- A triathlete gets a tattoo after completing an ironman competition
- the date of the competition
- a memorable image from the event
- A soldier gets a tattoo to commemorate his service unit
- a symbol that represents an inside joke
- the name of his unit
II. To express individuality
- To represent something in a person’s culture
- a culturally significant symbol
- an image associated with that culture
- To celebrate art
- an original piece of artwork
- a symbol associated with a famous artist or movement
- As a fashion statement
- a symbol that is particularly eye-catching
- an image that is beautiful
Rough Outline
A rough outline is less formal than a traditional outline. Working from a list, a brainstorm, or a freewrite, organize the ideas into the order that makes sense to you. You might try color-coding like items and then grouping the items with the same color together. Another method is to print your prewriting, then cut it up into smaller pieces, and finally put the pieces into piles of related items. Tape the like items together, then put the pieces together into a whole list/outline.
Freewriting
Freewriting is a technique that actually generates text, some of which you may eventually use in your final draft. The rules are similar to brainstorming and clustering:
- Write as much as you can, as quickly as you can.
- Don’t edit or cross anything out. (Note: if you must edit as you go, just write the correction and keep moving along. Don’t go for the perfect word, just get the idea on the page.)
- Keep your pen, pencil, or fingers on the keyboard moving.
- You don’t need to stay on topic or write in any order. Feel free to follow tangents.
- If you get stuck, write a repeating phrase until your brain gets tired and gives you something else to write. (Variation: I like to complain at this point, so I write about the fact that I’m stuck, I really hate having to do this, why isn’t it lunch-time already, etc.)
- Freewriting can be used just to get your mind working so that you can write an actual draft. In this case, you can write about whatever you want. Freewriting to generate ideas usually works best when you start with a prompt–an idea or question that gets you started. An example of a writing prompt might be “What do I already know about this topic?” Or “What is the first idea I have about my topic?” If you started with a list or an outline, you can freewrite about each item.
Looping
Looping is a technique built on freewriting. It can help you move within a topic to get all related ideas into writing.
- To begin, start with a freewrite on a topic. Set a timer and write for 5-15 minutes (whatever you think will be enough time to get going but not so much that you will want to stop).
- When the time period ends, read over what you’ve written and circle anything that needs to be fleshed out or that branches into new ideas. Select one of these for your next loop.
- Freewrite again for the same time period, using the idea you selected from the first freewrite.
- Repeat until you feel you have covered the topic or you are out of time.
Asking Questions
To stimulate ideas, you can ask questions that help you generate content. Use some of the examples below or come up with your own.
Problem/Solution: What is the problem that your writing is trying to solve? Who or what is part of the problem? What solutions can you think of? How would each solution be accomplished?
Cause/Effect: What is the reason behind your topic? Why is it an issue? Conversely, what is the effect of your topic? Who will be affected by it?
The set of journalist’s questions is probably the most familiar for writers. Using the journalist’s questions, sometimes called the five W’s, is an effective way to write about the basic information about your topic. Here are the questions:
- Who: Who is involved? Who is affected?
- What: What is happening? What will happen? What should happen?
- Where: Where is it happening?
- When: When is it happening?
- Why/how: Why is this happening? How is it happening?
If you imagine the questions as a cube, and separate why and how into two, you can use that visual image to remember the six questions.
Key Takeaways
- It is essential to understand the assignment before one begins writing.
- There are many different ways to brainstorm content for an essay.
- Which brainstorming technique to use might change depending on the type of assignment.
This chapter uses information from:
Successful Writing v. 1.0 which is licensed under a Creative Commons BY-NC-SA 3.0 license.
The Word on College Reading and Writing by Carol Burnell, Jaime Wood, Monique Babin, Susan Pesznecker, and Nicole Rosevear which is licensed under a Creative Commons Attribution-NonCommercial 4.0 International License.
Media Attributions
- danger_cluster
- making_walks_better_brainstorm
