
Chapter 8: High Impact Strategies
Courtneay Kelly

Mr. Kim is an 8th grade Geometry teacher. His 60-minute blocks of instruction typically consist of lectures and note-taking. He has noticed that his students’ attention wanes after 20-30 minutes, and that they often stare out the window or down at their shoes. He is unsure what to do because of the amount of content he needs to get through each day. While the school has placed intense pressure on teachers and students to do well on the state assessments, it seems as if constant drilling of the answers to sample questions modeled after that state assessment don’t lead to any increased knowledge or performance. Additionally, Mr. Kim recalls some of the strategies he learned in his teacher training program, and how exciting they were for both teachers and students. He wonders: when and where in my planning can I possibly add one more thing?
John Hattie (2009) and Robert Marzano (2001; 2010) are renowned as experts in their research on pedagogy that yields high levels of learning while also engaging students. Each of these researchers has conducted significant reviews of “what works best” in the classroom, though their methodological approaches differ. Marzano’s findings are heavily based on teacher-designed assignments and Hattie’s research focuses on standardized tests. However, while their methodological approaches are not alike, there is significant agreement between them when it comes to what works best in classroom instruction.
The following findings align with both Hattie’s (2009) and Marzano’s (2001, 2010) research findings. In order to achieve high levels of learning and engagement, is important that teachers:
- Provide a clear focus for each lesson
- Give overt, explicit instruction
- Provide opportunities for students to engage with content
- Provide mastery-oriented feedback (focused on process over product)
- Allow multiple exposures to content
- Provide opportunities for students to apply new content
- Provide collaborative opportunities
- Enhance students’ self-efficacy
Lesson Plan Template
| Lesson Components | Description |
| Context: Who are the students in the room? (grade, content area, demographics, interests) | |
| Rationale: Why are you teaching this lesson at this time to these students? | |
| Virginia Standards of Learning (VSOL): Include SOL numbers and language | |
| Objective (“KUD”) Students will know: Students will understand that: Students will be able to: |
|
| Assessment: What formative assessment will you use during the lesson? Attach it. What will/could be on the end-of-unit summative assessment that links back to this lesson (questions, prompts, portfolio artifacts, etc.)? | |
| Procedures: Provide detailed, numbered steps with simple language/short sentences for easy-to-follow instructions. Use a planning model that fits your purpose. Consider how your lesson approaches varying levels of Bloom’s Taxonomy (remember, understand, apply, analyze, evaluate, create) Make sure your procedures include when/how you would assess students. |
|
| Materials: What materials will be integrated during the lesson: books, articles, worksheets, maps, globes, technologies, etc.? | |
| Differentiation/UDL/Technology: What structures/supports will you proactively plan for to meet students’ needs before they arise? How is technology being used to create, facilitate, enhance, or personalize student learning? How does differentiated instruction supported by technology accommodate learner differences and needs in order to promote critical and creative thinking? |
|
| Reflection: What went well in this lesson? What changes would you make to this lesson in the future? What did you learn about your students? What will you need to do in subsequent instruction?(Make sure you reference data collected in this lesson throughout the reflection.) |
As seen above, the high-impact strategies in this chapter will fit in several different places in our template; the purpose of the strategy will determine how it is categorized in the lesson. With one exception (the Socratic Seminar), these methods are not models of instruction, but rather quick strategies that will work in conjunction with any other model of instruction that you choose. Below are eight easy-to-implement, practitioner-oriented instructional strategies that support Hattie’s and Marzano’s findings and that have been found to yield high levels of learning and engagement.
Strategy 1: Think Pair Share
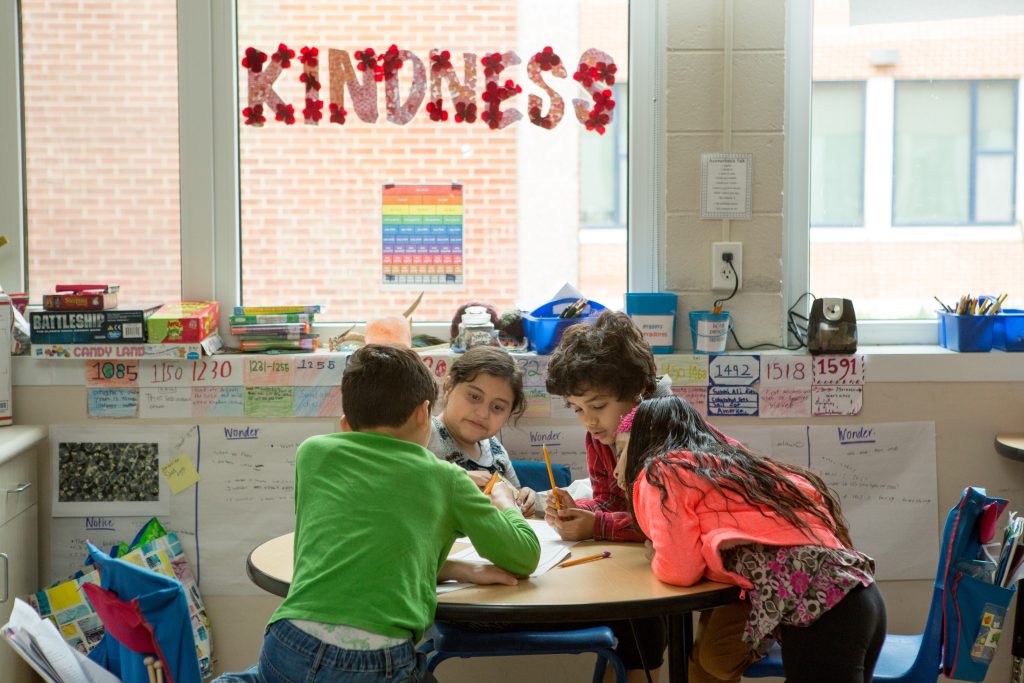
Think-Pair-Share (TPS; Figure 8.1) is a collaborative learning strategy in which students work together to discuss or solve a problem or to answer a question about an assigned topic. This strategy requires students to think individually about a topic or answer to a question and share ideas with classmates. Discussing with a partner maximizes student participation, focuses attention to the topic, and engages students in more deeply comprehending a concept.
Figure 8.1: Think-Pair-Share
How to Use TPS:
- Decide upon the text to be read and discussed or the question to be reviewed.
- Describe the purpose of the strategy and provide guidelines for discussions.
- Model the procedure to ensure that students understand how to use the strategy.
- Monitor and support students as they work through the following:T: (Think) Teachers begin by asking a specific question. Students “think” about what they know or have learned about the topic.P: (Pair) Each student should be paired with another student or a small group.S: (Share) Students share their thinking with their partner. Teachers expand the “share” into a whole-class discussion.
A useful TPS template can be found on the Reading Rockets website.
Strategy 2: Gallery Walk
During a gallery walk (Figure 8.2), stations or posters are set up around the classroom, on the walls, or on tables. Small groups of students travel from station to station together, performing an assigned task or responding to a prompt, either of which will result in a conversation.
Figure 8.2: Gallery Walk

How to Use a Gallery Walk
- Write: Create questions or prompts about a selected topic and write each on a piece of chart paper or on a white board. Hang or place the questions or prompts in various places around the classroom to create stations. Images, documents, problems, or quotes may also be used.
- Group: Group students into teams of three to five, with each group beginning at a separate station.
- Station Start: At their first station, groups will read what is posted. One group member should document the group’s responses, thoughts, and comments. If you prefer individual accountability, you may assign each student an individual documentation sheet.
- Rotate: After an allotted amount of time, the groups rotate to the next station. Students then read and discuss the previous group’s response and add content of their own. Repeat this process until all groups have visited each station.
- Monitor: As the teacher, it is important to monitor the stations while students participate. You may also need to provide clarification as students progress through the stations.
- Reflect: Have students go back to their first station to read all that was added to their first response.
Variations of Gallery Walks
- Graffiti: Items posted around the room do not have to be questions. They may be ideas or concepts. Large sheets of paper or chart paper are placed on the walls of the classroom. Students write their responses, draw pictures, and record their thoughts on the provided topic. Multiple colors are encouraged.
- I Like, I Wonder, Next Steps: Use a Gallery Walk format for students to get feedback on their work. Hang student products, such as drawings, visual representations, posters, etc. Students rotate around the room, providing feedback to the creator of the work. Students are asked to record something they like about the work, something they wonder about the work, and one thing the creator may do to improve or build onto their work.
- Gallery Run: This is a quicker version of a Gallery Walk. Questions are posted at each station that are lower-level questions, involving basic recall or comprehension. Students do not need to spend as much time discussing questions at each station, so they rotate at a much faster rate.
Strategy 3: Graphic Organizers
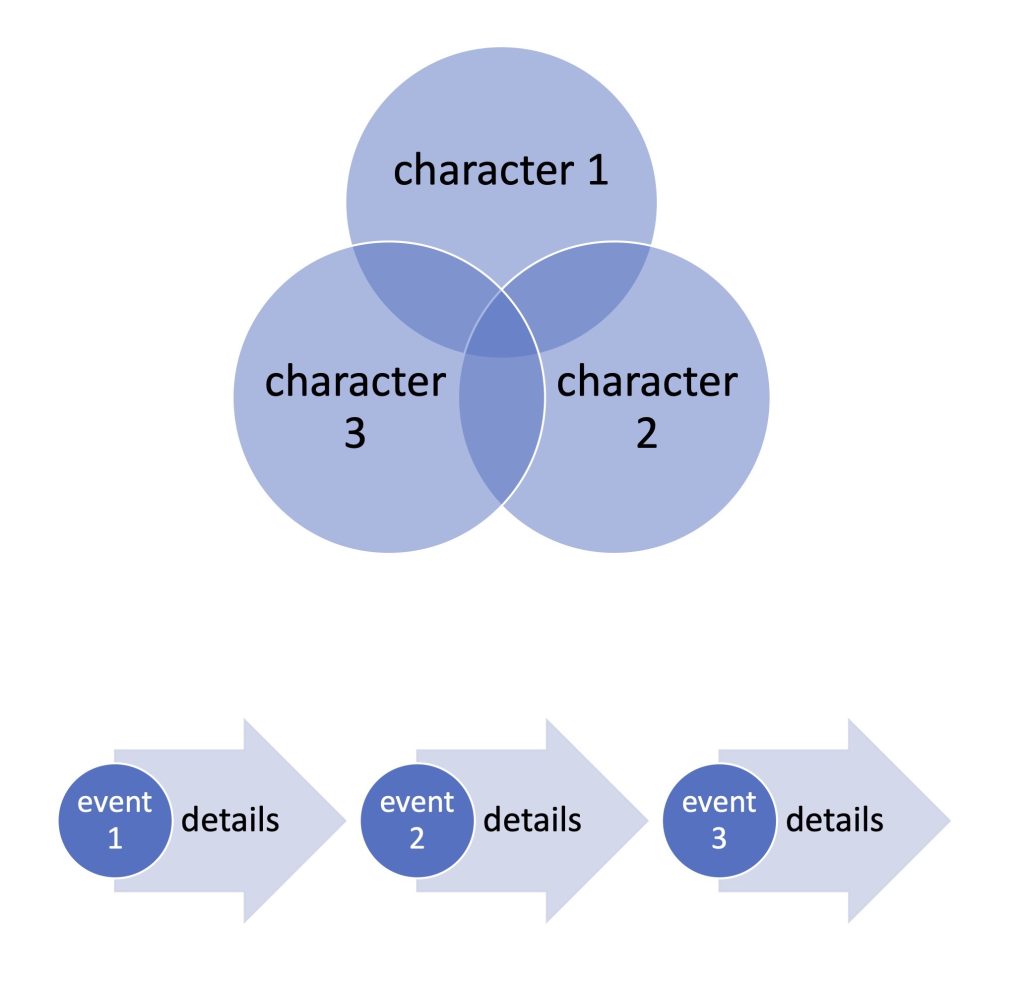
A graphic organizer (Figure 8.3) is a visual and graphic display that depicts the relationships between facts, terms, and or ideas. Graphic organizers are simple, effective tools that help students brainstorm and organize/synthesize their thoughts and ideas in a visual form. Visual aids such as flow charts, idea webs, and Venn diagrams (examples are pictured below) spur students to think about information through connections and comparisons. This helps them organize information in order to more aptly grasp new concepts. Graphic organizers are also sometimes referred to as knowledge maps, concept maps, story maps, cognitive organizers, advance organizers, or concept diagrams.
Figure 8.3: Examples of Graphic Organizers
The sites linked below offer several examples of graphic organizer templates:
- Free graphic organizers from Houghton Mifflin Harcourt (https://www.hmhco.com/blog/free-graphic-organizer-templates)
- Templates from Canva (https://www.canva.com/graphic-organizers/templates/)
- Free graphic organizers from Student Handouts (https://www.studenthandouts.com/graphic-organizers/)
Strategy 4: Visual Representations
Students activate more cognitive processes by exploring and representing their understandings in visual form. Visual representations allow learners to exhibit what they know and can do in alternative ways that can support one’s working memory during problem-solving and retention of information in long-term memory. Research indicates that, when information is constructed through the use of visual representations, students gain deeper and more enduring understanding of the content (Jewitt, 2008; Kress, 1997).
Visual representations are based on the Dual Coding Theory of information storage, which suggests that knowledge is stored in both linguistic and nonlinguistic forms (Paivio, 1990; Sadoski & Paivio, 2013). Linguistic knowledge is semantic in nature and is focused on the storage of words and language, while nonlinguistic knowledge refers to the storage of information using images, graphics, and physical sensations (Sadoski & Paivio, 2013). While research indicates that educators primarily lean on linguistic means of presenting instruction (Beesley & Apthorp, 2010; Paivio, 1990; Schmidt & Marzano, 2015), students require a balance of linguistic and nonlinguistic learning experiences in order for knowledge to stay in their long-term memory and to provide more accurate recall.
For example, a teacher wanted to see if students could create a visual representation that depicts a special education diagnosis. Figure 8.4 is a student’s creation that depicts the diagnosis of Attention Deficit & Hyperactivity Disorder (ADHD).
Figure 8.4: Example of Visual Representation

Strategy 5: Socratic Seminar (Inquiry-Based Approach)
The purpose of a Socratic Seminar is to achieve a deeper understanding about the ideas and values in a text. In the Seminar, participants question and examine issues and principles related to a particular topic, articulating different points of view. Participants work together to construct meaning through structured analysis, interpretation, listening, and reflecting. The key elements of a Socratic Seminar are: a selected text (which participants read PRIOR to the Seminar), a classroom environment conducive to this approach (such as a circle or square, in which all participants can see each other), and pre-selected questions (often written by the teacher and students).
Steps of the Socratic Seminar Model
- Select an appropriate text.
- Give students time to prepare.
- Discuss expectations/norms for the seminar.
- Conduct the seminar, led with predetermined questions.
- Students reflect on and evaluate the process.
Basic Structure of a Socratic Seminar
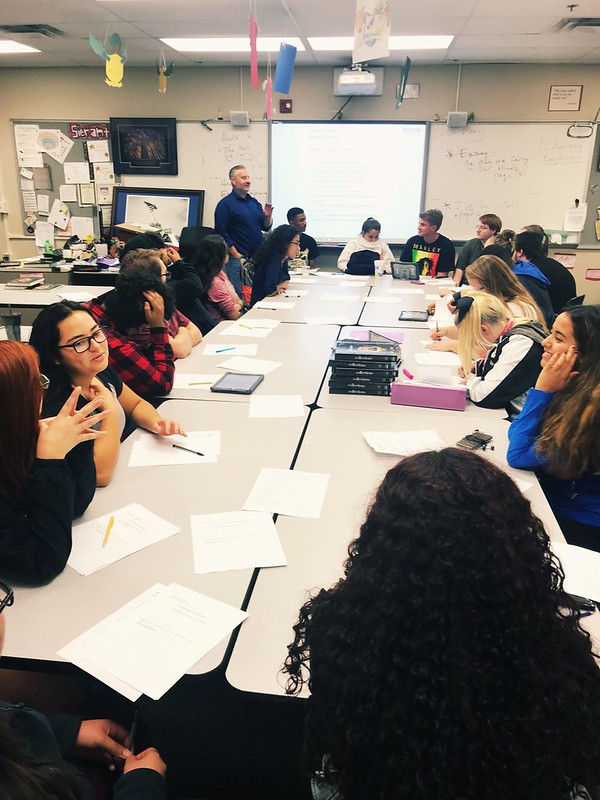
Participants prepare by reading a text or group of texts. The teacher provides questions, or students may design questions. On seminar day, participants sit facing each other and an introductory, open-ended question is posed by the teacher or discussion leader. From there, participants continue the conversation, prompting one another to support their claims with textual evidence. There is no order to how they speak, but they are encouraged to respectfully share the floor with others. Figure 8.5 shows students who are prepared to conduct a Socratic Seminar. They are arranged so that they can see all of the other students and also have space to take notes and refer to their texts.
Figure 8.5: Socratic Seminar
Variations of Socratic Seminars
If participants are beginners, the teacher may write the discussion questions, or the question creation can be a joint effort. For larger classes, teachers may need to set up seminars in more of a fishbowl-like arrangement, dividing students into one inner circle that will participate in the discussion, and one outer circle that silently observes, takes notes, and may eventually trade places with those in the inner circle, sometimes all at once, and sometimes by “tapping in” if they have something to add to the discussion.
Basic Structure of a Fishbowl Socratic Seminar
Two participants sit facing each other and the remaining participants sit in a circle around them. The two central participants have a conversation based on a pre-determined topic and often using specific skills the class is practicing (such as asking follow-up questions, paraphrasing, or elaborating on another person’s point). Participants on the outside observe, take notes, or perform some other discussion-related task assigned by the teacher.
Variations
One variation of this strategy allows participants in the outer circle to trade places with those in the fishbowl, doing a relay-style discussion, or they may periodically “coach” the fishbowl talkers from the sidelines. Teachers may also opt to have participants in the outside circle grade the participants’ conversation with a rubric, then give feedback on what they saw in a debriefing afterward.
Strategy 6: Philosophical Chair/Four Corners
Figure 8.6: Philosophical Chair/Four Corners
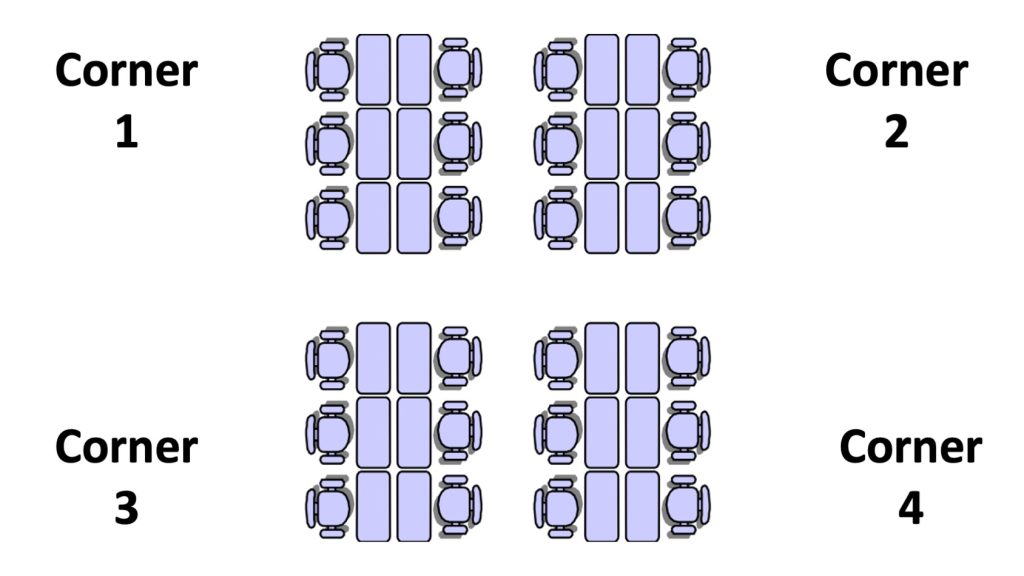
This is an effective approach when the teacher is presenting a concept or topic in which students’ opinions or thoughts may vary. To begin, the teacher makes a statement that has two or more possible responses. Students then move to the side or corner of the room that is “assigned” to their response. Once there, the students work together to create a brief “elevator speech” that justifies their selection. For example, a teacher may present the following question to young students: “Which of the four seasons is your favorite?” The teacher will then “assign” each season to a different corner of the room. Students move to their selected corner and then work together in small groups to explain why they chose that season. This strategy is effective in all curricular areas and can easily be integrated into lessons with students of all ages.
Variation
Often a Philosophical Chairs or Four Corners debate will be based around a text or group of texts that students have read ahead of time. Students are required to cite textual evidence to support their claims and typically hold the texts in their hands during the discussion. Some teachers set up one hot seat to represent each side, and students must take turns in the seat. In less formal variations (which require less prep), a teacher may simply read provocative statements students are likely to disagree on, and a debate can occur spontaneously without a text. Teachers may also opt to offer a continuum of choices, ranging from “Strongly Agree” on one side of the room, all the way to “Strongly Disagree” on the other, and have students place themselves along that continuum based on the strength of their convictions.
Mrs. K was a literacy specialist, which means she typically worked with students who assessed below grade level in reading. She was working with fifth graders, reading Frindle by Andrew Clements. Upon completion of the text, she put up four posters, one on each classroom wall. On each was written a quote from the text.
- “Who says dog means dog?”
- “But of course, all of this is just a silly fad, and when you add an ‘e’ to fad, you get fade. And I predict this fad will fade.”
- “All the kids loved lunchtime. But the awful part of lunch was the eating part–school food.”
- “Like the sunrise, some things just have to happen–and all you can really do is watch.”
Students were tasked with determining which quote resonated with them the most. They then were to go to that wall and explain their selection.
Strategy 7: Pinwheel Discussion
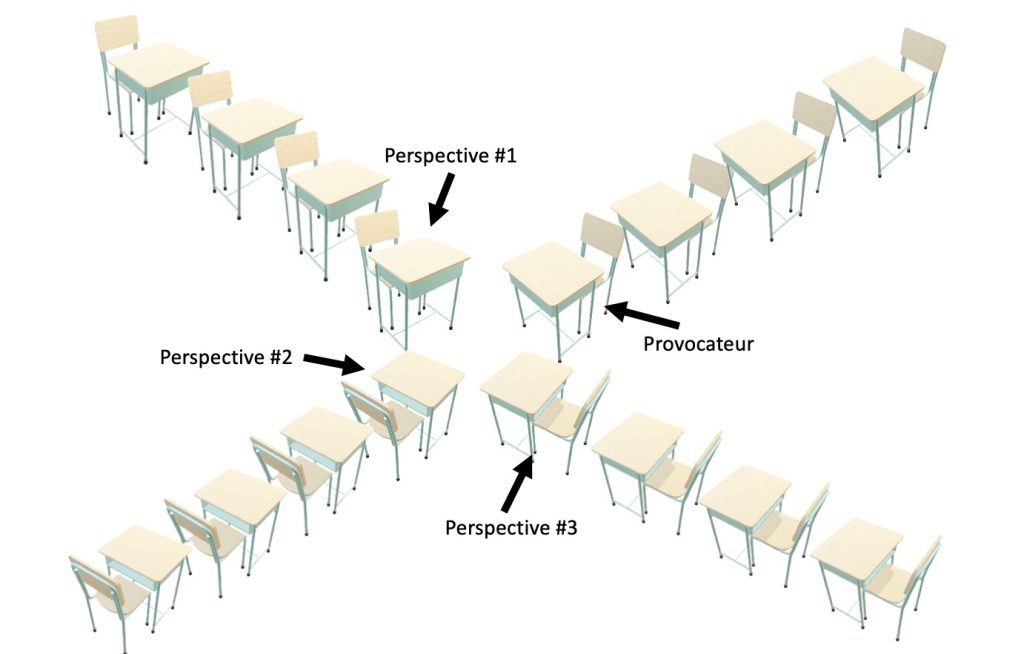
When setting up a pinwheel discussion, students are divided into four groups (Figure 8.7). Three of these groups are assigned to represent specific points of view. Members of the fourth group are designated as “provocateurs,” tasked with making sure the discussion keeps going and stays challenging. One designated speaker from each group sits in a desk facing speakers from the other groups, forming a square in the center of the room. Behind each speaker, the remaining group members are seated: two right behind the speaker, then three behind them, and so on, forming a kind of triangle. (From above, this would look like a pinwheel.) The four speakers introduce and discuss questions they prepared ahead of time with their groups. After a predetermined amount of time passes, new students rotate from the seats behind the speaker into the center seats and continue the conversation.
Figure 8.7: Pinwheel Discussion
Strategy 8: Movement-Integrated Approaches
Figure 8.8: Movement-Integrated Approaches

Many students (arguably most students) are unable to sit and focus for long periods of time without a break to move or stretch. Integration of opportunities to move is beneficial for students of all ages. Some examples of movement-integrated learning are listed below:
- Stand Up Instead of Sitting Down. It is well-understood that sitting for extended periods of time is bad for your health. But did you know that standing up may improve students’ comprehension and retention? When we stand, our bodies are more engaged and connected to the learning process. For this reason, many teachers are investing in sets of standing desks to offer students the flexibility to sit or stand during learning.
- Combine Classwork with Exercise. Combining learning with physical activity keeps students energized and encourages retention of content. It is beneficial to take a break during periods of instruction for 30-60 seconds of stretching, jumping jacks, etc.
- Utilize Small Movements. It may not always be possible to stand up and do high knees or jumping jacks during a lesson, but teachers can still integrate kinesthetic study strategies to keep students engaged. For example, students can twist a rubber band around their wrist or pencil while working. They may squeeze a stress ball or tap their feet. Even if the motions are small, they’ll help you stay focused and attentive.
- Pens, Pencils, Highlighters, Sticky Notes. It is helpful to train students to underline important vocabulary or concepts. They may highlight and color code passages that connect to one another and use a pencil to draw flow charts that help break down passages into smaller chunks. Sticky notes can be used as well.
- Tension and Relaxation. When integration of larger movement is not possible, students may use the tension and relaxation technique to stay focused. In intervals of five to ten seconds, have students tighten a particular muscle. Then tell them to relax when the seconds have passed. This technique helps to release unwanted tension.
- Multiple Modes of Instruction. Offer various methods of instruction—lectures, paired readings, group work, experiments, projects, plays, etc. This increases engagement and allows for movement during transitions.
Revisiting Mr. Thomas
Mr. Thomas decided to seek support from his school’s instructional coach. She suggested that he embed strategies that promote engagement and motivation. He soon came to find that the integration of Socratic Seminars and Four Corners approaches yielded student learning that was engaging and longer-lasting. He was excited to align these approaches with his history content and found that, in addition to his students’ increased engagement, he was also more motivated to teach.
Key Chapter Takeaways
- Variability in instructional modes yields higher student engagement, motivation, and learning.
- Four high-yield instructional approaches that have been found to increase student motivation and engagement while working independently and in small groups are: Think-Pair-Share, Graphic Organizers, Visual Representations, and Movement Integration.
- Four high-yield instructional approaches that have been found to increase student motivation and engagement while working in a whole-group setting are: Gallery Walks, Socratic Seminars, Philosophical Chairs/Four Corners, and Pinwheel Discussions.
Application Questions
- You believe strongly in the importance of note-taking. What are some ways to make this task more engaging?
- You are a high school teacher and have completed instruction on the branches of government. Name three high-yield instructional approaches that you could integrate to reinforce overall learning of the concepts.
- You are an art teacher and are focusing on encouraging students to derive meaning from famous works of art. You know that each piece is open to interpretation and you want to encourage deep discussion and reflection. Which high-yield instructional models could you integrate to meet this goal?
- You are teaching a math unit on fractions and want the students to “think outside of the worksheet” to apply their understanding to real life scenarios. How could you integrate a high-yield instructional strategy to support this?
References
Beesley, A., & Apthorp, H. (2010). Classroom instruction that works, second edition: Research report. McREL.
Hattie, J. (2009). Visible learning: A synthesis of over 800 meta-analyses relating to achievement.
Hattie, J. & Donoghue, G. (2016). Learning strategies: A synthesis and conceptual model. npj Science of Learning.
Jewitt, C. (2008). Multimodality and literacy in school classrooms. Review of Research in Education, 32(1), 241-267.
Kress, G. (1997). Before writing: Rethinking the paths to literacy. Routledge.
Marzano, R., Pickering, D., & Pollock, J. (2001). Classroom instruction that works. ASCD.
Marzano, R. & Pickering, D.. (2010). The highly engaged classroom. Solution Tree Press.
Paivio, A. (1990). Mental representations: A dual coding approach. Oxford University Press.
Sadoski, M., & Paivio, A. (2013). Imagery and text: A dual coding theory of reading and writing. Routledge.
Schmidt, R. & Marzano, R. (2015). Recording and representing knowledge. Learning Sciences International.
