
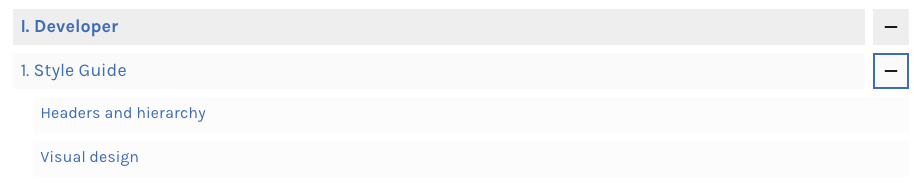
Developer
Style Guide
Text formatting
Italics
Use italics for emphasis (but not so often that it becomes distracting).
The old OMT used italics for terminology. Because we will be using the glossary function, we no longer need to italicize terminology. Remove italics when used simply to highlight a term, and instead replace it with a glossary link.
Bold
We don’t have many use-cases for bold in this book. Be sure you are not using bold in place of header styles.
Underline
Do not use!
Scale degrees & Accidentals
LaTeX will yield carats above numbers with the following formula (replacing x with the scale degree of your choice):
![latex]\hat{x}[/latex]
[latex]\hat{x}[/latex]
To add flat signs, you can add \flat to the shortcode; add \sharp for sharp signs, and \natural for natural signs:
![latex]\flat\hat{x}[/latex]
[latex]\flat\hat{x}[/latex]
Figures
If you’re just typing 7 or 6 or another single figure, you can simply use superscript. But if you need multiple figures, you will want to use LaTeX. Substitute x and y below for the figures you need. Each row of figures is separated with \\, and numbers are listed from top to bottom.
![latex]\begin{smallmatrix}x\\y\end{smallmatrix}[/latex]
[latex]\begin{smallmatrix}x\\y\end{smallmatrix}[/latex]
Here are some other possibilities:
![latex]\begin{smallmatrix}6-5\\4-3\end{smallmatrix}[/latex]
[latex]\begin{smallmatrix}6-5\\4-3\end{smallmatrix}[/latex]
![latex]\begin{smallmatrix}8-8-7\\6-5-5\\4-4-3\end{smallmatrix}[/latex]
[latex]\begin{smallmatrix}8-8-7\\6-5-5\\4-4-3\end{smallmatrix}[/latex]
Music (audio) examples
We will embed Spotify links for music examples. You can simply copy-paste the Spotify URL and Pressbooks will convert it to an embedded player. VIVA has requested that we avoid YouTube because of copyright concerns; however, linking to official accounts should not cause problems, if you absolutely must use YouTube.
Provide timestamps when discussing a specific portion of the song.
Images and musical notation examples
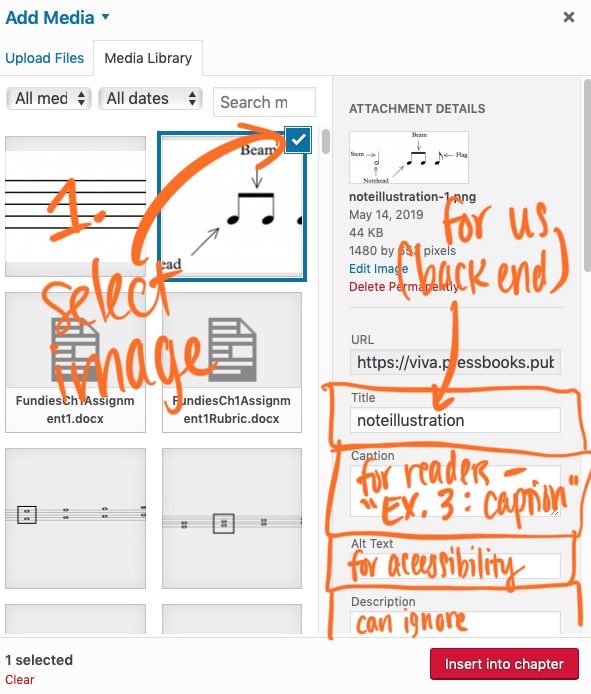
Enter captions, alt text, and a human-friendly image title using the image metadata (please don’t skip this). This can be accessed when you click “add media,” via the sidebar on the right. You can also enter this information after adding an image to the chapter by selecting the image and clicking the pencil icon.
If the image is large and would be best viewed full-size, then be sure to select Link To > Media File in the image options. This will allow a “lightbox” effect, where the user clicks the image, and it shows a full-size version as a pop-up. To see an example of this, you can click the image to the right. You may want to put “Click to enlarge” in your caption if you are using this option.
When adding color to an example, try to adhere to this color scheme I’ve established for the book.
 Use MuseScore embeds when audio will be particularly helpful to the student. If the audio is unnecessary, then an image may be a better choice as it takes up less space on the page.
Captions
- Use the title “Example” rather than “Figure,” etc.
- We are numbering the examples (manually, unfortunately). Just do simple numbers within chapters, rather than the compound numbering that references a chapter number, since chapter numbering is dynamic and changes as we add/remove chapters.
- Wrap “Example X” in <span class=”example-caption-name”></span>. This will apply formatting to the example name so that it’s easier to see when scanning the page. To do this, highlight “Example X” and click Apply Class (palette icon in the text editor) and type in example-caption-name.
- If you need to add a caption to something that is not an image upload, type it in as normal text, then highlight your caption and click Apply Class (palette icon in the text editor) and type in example-caption-text. You won’t see a difference in the editor, but when you publish the page, it will have the correct formatting.
Music notation
- For musical notation examples, use Musescore where possible, so that we can embed it as an iframe.
- Musescore has the ability to export images as transparent background .pngs through the Image Capture tool.
- I have created a custom style that includes text styles you should use to annotate your examples—please use them so that our annotations look consistent. Download the style here and then load the style in Musescore. (If you make a change to the style that you think would benefit everyone, save the style with the same name (“OMT musescore style”) and upload it to the Drive folder to replace the old style. Then, let everyone know in the Slack channel that it’s been updated, so we know to reload the style.)
- Embedded examples should not have score titles, as it takes up too much space on the page.
Embedding Musescore examples
- Follow MuseScore’s guide for uploading online from your MuseScore app on your computer (“Share a Score Directly from MuseScore”) , logging into the OMT account
- Score should be public to be able to embed.
- Go to MuseScore.com and log into the OMT account.
- In the dropdown menu on the top right that appears when you click the OMT username, click “My Scores”
- Open the score you want and click “share” in the sidebar on the right
- Click “embed” and copy the part of the code that is in between the <iframe></iframe> tags
- Go to the “text” tab of your chapter and paste this code where you want the embedded example to appear.
This is the video from Brian explaining how to get prettier MuseScore embeds.
Headers
Please use header styles rather than hard-coding (e.g., making the text larger and bold). Headers are hierarchical and make our book comply with accessibility standards.
Mostly, we will be using Header 1 and Header 2. Here is a visual guide for what constitutes a header:
How to use each header:
- Header 1 (h1): Use for the sub-chapter level. For example, in a chapter on Species Counterpoint, each Header 1 would be “first species,” “second species,” “fourth species,” etc. These headers will show up as sub-chapters in the TOC page. Note: The original OMT used a separate page for each sub-chapter. We will want to group these pages together into single chapters, that are then divided with Header 1.
- Header 2 (h2): Use for important sections within each sub-chapter. For example, a chapter on V43 and viiº6 will have a subchapter called “Harmonic progressions using V43/viiº6”, and underneath that, an important section using Header 2 would be “V43 and viiº6 as passing chords between I and I6”. Please use this header frequently, as it helps break up the text for the student.
- Headers 3–6: I don’t think we will have much use for these header levels. Avoid using them for now.
Chapter appendices (i.e., “Assignments,” “Resources,” etc.)
Reserve headers for sections within chapters. For chapter appendices, put the title of the appendix in the “shaded text box,” available by selecting Textboxes > Shaded in the text editor.
Anchors
Add anchors to all h1 lines to help with navigation. You can do this by putting the cursor at the beginning of the line, then clicking the bookmark icon in the text editor. The anchor should be the same as the heading, but all lowercase and with hyphens instead of spaces (e.g., Visual Design becomes visual-design). Doing this allows us to link to specific headers elsewhere in the text.
Tables
We are using TablePress for tables. You will build your table in TablePress first. I have made a template table so that you can keep all the same settings by Copying that table, rather than starting from scratch. This will ensure that most of our formatting settings are consistent.
Once you have copied the table, hover over the new table (“Copy of Example X: caption”) in the menu and click Edit. Enter your data, tweak settings, etc. The following options must be selected:
- The first row of the table is the table header.
- Show the table name below the table.
Once you have finished making your table, copy the shortcode (on the right, under Table Information) and paste this shortcode into your chapter where you want the table to appear.
You can see a demo on the AABA form chapter.
Other special formatting
Wordpress/Pressbooks/the internet has a lot of options for formatting that are different from traditional publishing venues, and we should make use of them.
Text boxes
Pressbooks offers special kinds of text boxes. Here are how we are using certain text boxes:
- Shaded: use for chapter appendices.
While we have not yet discussed exactly how we will use these, I think we should, eventually, in order to break up our text. We can also design custom text boxes if we decide we’d like to do that.
All text boxes can also be formatted to appear to the right side of the text, rather than in the middle of the text.
Quotes
The text editor has an easily-visible quote format button. This will make basically a block quote for you.
This is a block quote this is a block quote this is a block quote this is a block quote this is a block quote this is a block quote this is a block quote this is a block quote this is a block quote this is a block quote
There is also additional quote formatting options in the Formats dropdown menu; specifically, formatting for pullquotes. Pullquotes look like this. I’m not sure what use we would have for pullquotes at the moment but maybe we will come up with something.
Links
Internal links
When linking to something within OMT, use relative links by typing in the chapter title into the URL box and then selecting the appropriate chapter from the drop-down menu. This helps future-proof the website: with relative links, we can change the domain etc. as needed without needing to fix all the links.
You can link to an anchor on the same page by simply typing #anchorname where you would normally enter a URL. There is no need to do the whole URL followed by the anchor, and in fact, this may make things worse down the line.
External links
Try to provide external links only to stable sources.
Accessibility
Alt text
We will be using a lot of images, and it’s important to add alt text to all of them to help people with screen readers. Read up on alt text and make it a part of your workflow. If the image is not important, you can make a null alt text by typing “” into the alt text box.
Headers and hierarchy
Headers are essential to screen reader parsing. Incorporate them in order to make the text accessible. Header rows within tables are also important for screen readers.
Link text
Because screen readers will sometimes skip through texts and go directly to links, without reading the surrounding text, it’s important to make link text descriptive. Link texts should make sense out of context. Using words like “click here” or pasting the URL again are not good for users of screen readers.
Citations
Use Chicago full note for citations. Put citations in footnotes by clicking the FN button in the text editor.
Punctuation
In general
When in doubt, use Chicago style.
Dashes and hyphens
Dashes and hyphens are not the same!
Use hyphens (-) in hyphenated words.
Use en dashes (–) to show ranges of numbers, e.g., in a page range. On Macs, you can get this by pressing ⌥-; on Windows, press Alt+0150.
Use em dashes (—) rather than two hyphens when setting off important parenthetical comments. On Macs, you can get this by pressing ⇧⌥-; on Windows, press Alt+0151.
Spelling
American spellings! (sorrynotsorry, Bryn and Mark.)
Visual design
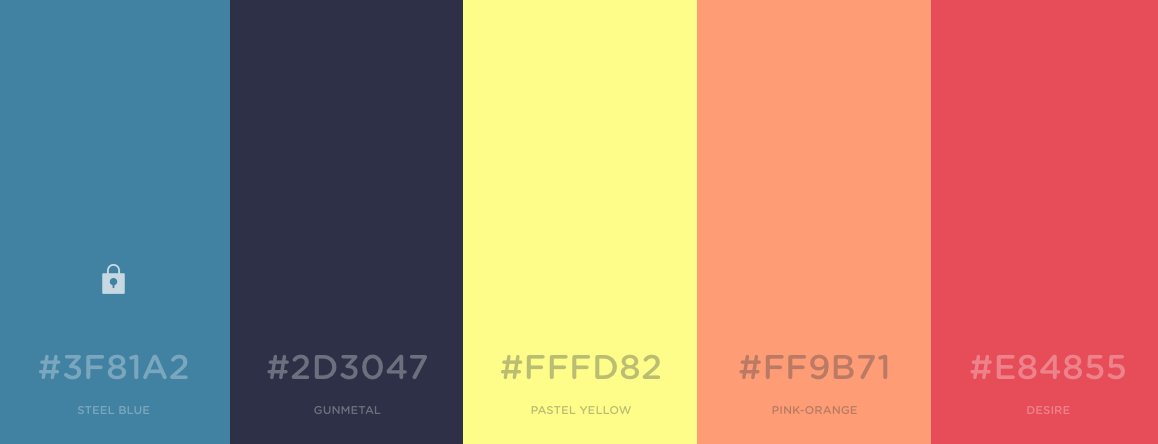
Color palette
I generated a color palette for us to use, based on the steel blue used in the original OMT. Use this link to find hex codes: https://coolors.co/3f81a2-2d3047-fffd82-ff9b71-e84855
Preview of elements
Header 1
Header 2
Header 3
Header 4
Header 5
Header 6
Preformatted text
Block quote block quote block quote Block quote block quote block quote Block quote block quote block quote Block quote block quote block quote
Examples
This is an examples text box.
Exercises
This is an exercises text box.
Key Takeaways
This is a key takeaways text box.
Learning Objectives
This is a Learning Objectives text box.