14 Threads
Wally Baumback and Frances Davis
Learning Outcomes
When you have completed this module, you will be able to:
- Apply the POLYGON and THREAD commands.
Geometry Lesson: Regular Polygons
A polygon is defined as any plane figure bounded by straight lines. A regular polygon is a polygon that has equal angles, equal sides and can be inscribed in or circumscribed around a circle. The first eight regular polygons are shown below.

Any regular polygon can be inscribed in or circumscribed around a circle as shown, using a hexagon, below.

Inventor Command: POLYGON
The POLYGON command is used to draw a regular polygon on a 2D sketch. You can select the number of sides for your polygon.
Drawing Threads
The THREAD command is used to draw exterior threads or interior threads on a 3D solid model. The threads created using the THREAD command are not actual threads constructed on the model. They are simply a graphical representation of the threads. A 3D printed model created from exporting the Inventor part would not be threaded. Actual threads can be created by revolving the correct shape. However, for this course when you need threads you can use an online thread modeler.

Inventor Command: THREAD
The THREAD command is used to draw a graphical representation of an outside or inside diameter thread. The thread specifications can also added to the thread properties.

Workalong
This workalong example explores using polygons and threads.
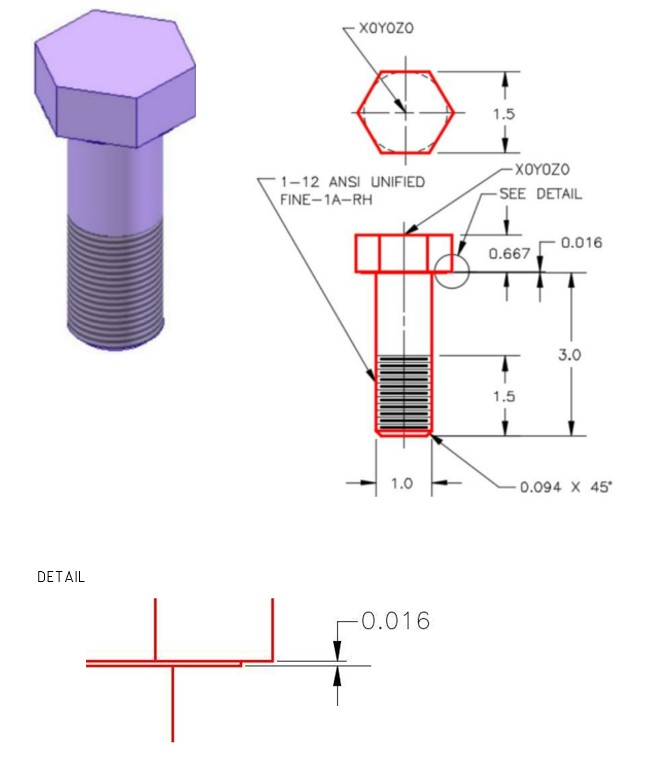
| Threads Workalong 01 | ||
| Part Name: Threads01 | Project: | Units: Inches |
| Template: Standard (in).ipt | Color: N/A | Material: Stainless Steel |
|
Step 1 Start a new part file with the template and filename shown above. Step 2 Follow along with the video to create the part shown below.
|
||
Exercises
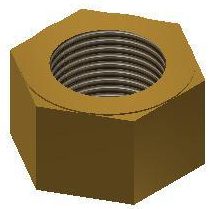
| Practice Exercise 5-1 | Time Allowed: 30 Min. | |
| Part Name: Inventor_Ch5E01 | Project: | Units: Inches |
| Template: Standard (in).ipt | Color: N/A | Material: Brass, Soft Yellow |
|
Using what you learned in the last workalong, construct the nut shown in the multiview drawing. Draw the necessary sketches and extrude or revolve them to produce the nut shown below. Apply all of the necessary geometrical and dimensional constraints to maintain the objects shape and size.
|
||