
I. Fundamentals
Notation of Notes, Clefs, and Ledger Lines
Chelsey Hamm
Key Takeaways
- A note indicates both pitch and rhythm.
- Notes are written on a staff. Notes with a higher frequency (shorter wavelength) are written higher on the staff than notes with a lower frequency (longer wavelength). That is, higher notes are placed above lower ones.
- A notehead must be written carefully on a staff. A notehead is oval (not round); additionally, it should be neither too large nor too small, and it is tilted slightly upward toward the right.
- The stems of notes can point either upward (on the right side of a note) or downward (on the left side of a note). For notes above the middle line, the stem points downward, and for notes below the middle line, stems point upward. Notes on the middle line can point in either direction, depending on the surrounding notes.
- Writing seconds always involves displacing one note to the left or right of a stem. The lower note always goes on the left, regardless of whether the stem points up or down.
- A clef indicates which pitches are assigned to the lines and spaces on a staff.
- Extra lines (that are small) called ledger lines extend a staff higher or lower.
Western musical notation privileges two musical features: pitch and rhythm. Pitches are notated vertically (on the y-axis), while rhythms are notated horizontally (on the x-axis). Western musical notation is read left-to-right and top-to-bottom, like the page of a book in written English.
Notation of Notes
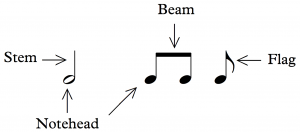
A note indicates both pitch and rhythm. Each written note consists of a notehead (either empty or filled in) and may also have a stem and a beam or flag (see Notating Rhythm). Example 1 shows an illustration of noteheads, stems, beams, and flags:
Staff Notation
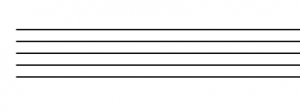
A staff (plural “staves”) is essential for conveying pitch. A staff consists of five horizontal lines, evenly spaced, and each note is placed on the line or space that corresponds to its pitch (see Clefs below). Example 2 depicts a staff:
Placing Notes on a Staff
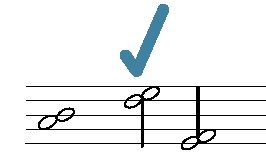
Noteheads on a line should fill in half of each space above and below. Noteheads in a space should just touch the lines above and below. Example 3 shows examples of correct noteheads, both open and filled in, both on lines and in spaces:

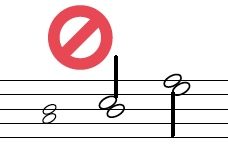
Noteheads should be oval (not round), and they are tilted slightly upward toward the right. Example 4 shows incorrect noteheads.[1] As you can see, noteheads can be drawn too small, too big, or the wrong shape.

Stems and Beams
The stems of notes can point either upward (on the right side of a note) or downward (on the left side of a note). For notes above the middle line, the stem points downward, and for notes below the middle line, stems point upward. Notes on the middle line can point in either direction, depending on the surrounding notes. This is shown in Example 5:

Stemming directions and beaming conventions are discussed more in Simple Meter and Time Signatures and Compound Meter and Time Signatures. When hand-drawing stems, their length is equal to four lines of the staff. Beams are about four times thicker than stems.
You can practice stemming directions by dragging and dropping in the following exercise:
Drawing Seconds
When notes at the interval of a second (see the Generic Intervals section of The Keyboard and the Grand Staff) occur harmonically, they are on an adjacent line and space of the staff, so one note needs to be displaced to the left or right of the stem. The lower note always goes on the left, regardless of whether the stem points up or down. Example 6 shows the correct way to draw seconds:
Seconds should not be stacked on top of one another, nor should the lower note be on the right, as seen in Example 7:
Drawing seconds in seventh chords is discussed in Seventh Chords.
Clefs
The notes drawn on the lines and spaces of a staff represent pitches. Musicians use spatial metaphors to describe notes placed on a staff: notes appearing toward the top of the staff are said to be “higher” than those toward the bottom, which are said to be “lower.” Higher pitches are produced by sound waves with a shorter wavelength (and consequently a higher frequency); sound waves with a longer wavelength (lower frequency) produce lower pitches.
For notes to convey pitch information beyond “higher” and “lower,” the staff on which they appear must include a clef. A clef indicates which pitches are assigned to the lines and spaces on a staff (see also Reading Clefs). The two most commonly used clefs today are the treble clef and bass clef. Two other clefs that you may encounter are the alto clef and the tenor clef. Example 8 shows the same pitch placed after the treble, bass, alto, and tenor clefs:
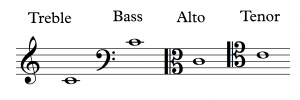
Higher notes, such as those played by a flute or sung by a soprano, are usually written in treble clef, and lower notes, such as those played by a trombone or sung by a bass, are usually written in bass clef. Alto and tenor clefs are relatively rare compared to treble and bass. But in some cases, alto clef is used for medium-high notes, and tenor clef is used for medium-low notes.
Drawing Clefs
One can draw a treble clef in three simple steps, as demonstrated in Example 9:[2]
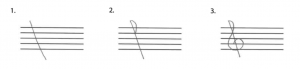
- Draw a slanted vertical line that extends slightly above and below the staff.
- Draw a half circle that intersects with your slanted line at the second staff line from the top.
- Circle around the second staff line from the bottom. Try to keep your circle within the bottom two spaces.
Likewise, one can also draw a bass clef in three steps, as shown in Example 10:
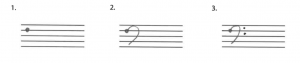
- Draw a dot on the second staff line from the top.
- Draw a backward C that ends in the bottom space of the staff, making sure that the top part of the C does not extend above the staff.
- Place two dots to the right of the backward C, centered respectively in the top two spaces of the staff.
One can draw an alto clef in four steps, as Example 11 shows:

- Draw a thick vertical line that spans the staff.
- Draw a thinner vertical line next to it.
- Draw two backward Cs, the first taking up slightly less than the top half of the staff and the second taking up slightly less than the bottom half of the staff.
- Connect these backward Cs with a point that rests on the middle line of the staff.
As seen in Example 12, the tenor clef is drawn the same way as the alto clef, just shifted up one line of the staff higher. The vertical lines in steps 1 and 2 begin on the second staff line from the bottom and extend slightly above the staff. The first backward C extends slightly above the top half of the staff, and the second takes up slightly less than the middle two spaces of the staff. The point connecting them rests on the second staff line from the top.

Sometimes when musicians draw the alto or tenor clef, they do so by writing the letter “K” as a form of shorthand. Example 13 shows this:

Writing Ledger Lines
When notes are too high or low to be written on a staff, small lines called ledger lines are drawn to extend the staff. Example 14 shows ledger lines written above and below a staff:

Example 15 shows notes (with stems and beams) drawn on ledger lines, above and below a staff.

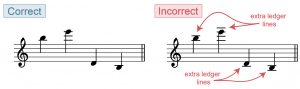
When writing ledger lines, be sure not to put in an extra ledger line above or below the note you are writing. Example 16 first shows the correct way of writing notes on ledger lines, followed by the incorrect way, with extra ledger lines above and below the notes:[3]
- 2001. “Ledger line.” Grove Music Online. https://doi.org/10.1093/gmo/9781561592630.article.16296.
- Gerou, Tom and Linda Lusk. 1996. Essential Dictionary of Music Notation. Los Angeles: Alfred.
- Gould, Elaine. 2011. Behind Bars: the Definitive Guide to Music Notation. London: Faber Music.
- Hiley, David. 2001. “Clef (i).” Grove Music Online. https://doi.org/10.1093/gmo/9781561592630.article.05927.
- ——. 2001. “Staff.” Grove Music Online. https://doi.org/10.1093/gmo/9781561592630.article.26519.
- McGrain, Mark. 1986. Music Notation. Boston: Berklee Press.
- Roemer, Clinton. 1985. The Art of Music Copying: The Preparation of Music for Performance, 2nd edition. Sherman Oaks: Roerick Music Company.
- Straus, Joseph. 2022. Elements of Music. New York: Oxford.
- Pitch and Frequency (the Physics of Sound) (physicsclassroom.com)
- The Music Staff (essential-music-theory.com)
- Drawing Notes (YouTube)
- Clefs (Music Notes Now)
- Drawing Treble and Bass Clefs (YouTube)
- Drawing C Clefs (Ultimate Music Theory)
- The Staff, Clefs, and Ledger Lines (musictheory.net)
- Music Notation Style Guide (Indiana University)
- Writing Noteheads, Clefs, and Ledger Lines (with C clefs) (.pdf, .docx). Asks students to practice handwriting elements of music notation.
- Writing Noteheads, Clefs, and Ledger Lines (Treble and Bass clefs only) (.pdf, .docx). Asks students to practice handwriting elements of music notation.
Media Attributions
- Noteheads, Stem, Beam, Flag © Bryn Hughes is licensed under a CC BY-SA (Attribution ShareAlike) license
- Staff © Chelsey Hamm is licensed under a CC BY-SA (Attribution ShareAlike) license
- Correct Noteheads © Megan Lavengood (adopted from Straus) is licensed under a CC BY-SA (Attribution ShareAlike) license
- Incorrect Noteheads © Megan Lavengood (adopted from Straus) is licensed under a CC BY-SA (Attribution ShareAlike) license
- Stemming Directions © Chelsey Hamm is licensed under a CC BY-SA (Attribution ShareAlike) license
- Correct Seconds © Megan Lavengood (adopted from Straus) is licensed under a CC BY-SA (Attribution ShareAlike) license
- Incorrect Seconds © Megan Lavengood (adopted from Straus) is licensed under a CC BY-SA (Attribution ShareAlike) license
- Four Clefs and Notes © Kris Shaffer (OMT) is licensed under a CC BY-SA (Attribution ShareAlike) license
- Draw Treble Clef © Chelsey Hamm is licensed under a CC BY-SA (Attribution ShareAlike) license
- Draw Bass Clef © Chelsey Hamm is licensed under a CC BY-SA (Attribution ShareAlike) license
- Draw Alto Clef © Chelsey Hamm is licensed under a CC BY-SA (Attribution ShareAlike) license
- Draw Tenor Clef © Chelsey Hamm is licensed under a CC BY-SA (Attribution ShareAlike) license
- K Clefs © Chelsey Hamm is licensed under a CC BY-SA (Attribution ShareAlike) license
- Ledger Lines without Notes © Megan Lavengood is licensed under a CC BY-SA (Attribution ShareAlike) license
- Ledger Lines with Notes © Chelsey Hamm is licensed under a CC BY-SA (Attribution ShareAlike) license
- Correct Incorrect Ledger Lines © Sarah Louden is licensed under a CC BY-SA (Attribution ShareAlike) license
A musical sound that has both a pitch and a rhythmic component; the symbol may include a stem, beam, and/or flag.
A discrete tone with an individual frequency.
The duration of musical sounds and rests in time.
Five evenly spaced horizontal lines on which notes are placed.
The elliptical part of the note. Can be either filled in (black) or outlined (white).
A vertical line that originates at the notehead, used to indicate rhythm and voicing.
A symbol placed on the left side of a staff that indicates which notes are assigned to different lines and spaces.
Small lines written above or below a staff to extend the staff's range of notes.
The horizontal lines that connect certain groups of notes together.
A curved line placed at the end of a stem. Each flag added to a stemmed note represents the reduction of the note value by half. For example, the symbol for an eighth note is like a quarter note plus a flag; the eighth note is one-half the value of the quarter note.
An acoustic wave (energy vibration) that is perceived as sound.
The distance between two peaks of a sound wave.
Acoustically, how often a sound wave repeats; the pitch of a sound.
As a "G" clef, the treble clef designates the second-lowest line of a staff as G₄ by curling around it.
As an "F" clef, the bass clef shows which line of the staff is F₃ by surrounding it with two dots.
As a "C" clef, the alto clef shows that C₄ is the middle line of the staff by centering on it.
As a "C" clef, the tenor clef shows that the second-highest line of the staff is C₄ by centering on that line.
